It is holiday time again. Off to Japan for a couple of weeks. 3 days in Tokyo then a cruise around the northern islands. Back on 12th June, hopefully with lots of photos.
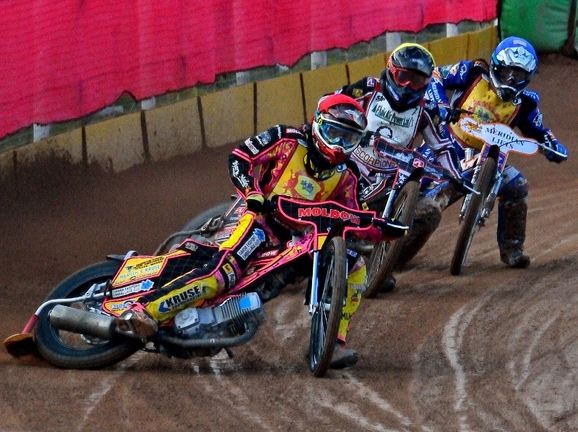 I took some sports photos this week, but had to raise the ISO to 3200 because it was evening and low light. This resulted in some noise (as can be seen in the first photo) 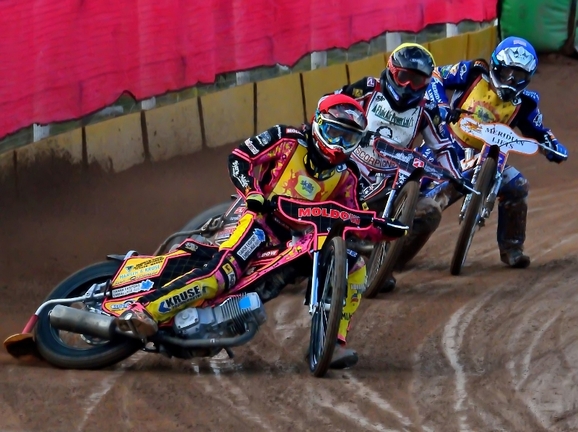 A photographer told me about some free noise reduction software, so I downloaded it at gave it a try. It works! (See second photo) It is called Noiseware Community Edition and can be found here:-
http://noiseware-community-edition.en.softonic.com/ ONE WORD OF WARNING - Use CUSTOM INSTALL not auto install. Auto install will install various unwanted extras on your toolbar. You have to close the prompt box to purchase the full edition each time you use it, but that is no real hassle. Open a file, choose the type of suppression (I used full suppression) and then save the file after conversion. It only takes a few seconds per photo. 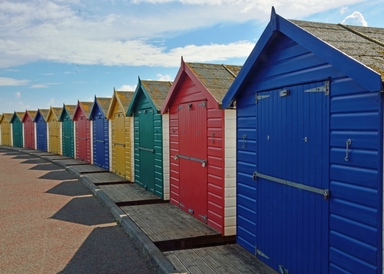 We went for a long walk the other day and I was feeling really sore and tired at the end of it because I am currently suffering from sciatica. However, in the distance I spotted the rear of a group of beach huts and suspected they might be worth photographing. So I struggled the couple of hundred yards up to them and was rewarded by some nice photos. The moral of the story - if you can, go the extra mile as it probably will be worth it....
The process of taking a photo is very personal and varies enormously. I thought I would share my process with you. It may help, it may not.
When I raise the viewfinder to my eye, unless it is a very quick "grab" shot just to capture the moment before it is gone, I will think. That thinking follows a process even though it may be subconscious. First, I try to see what I want to include within the frame. With a zoom lens this may mean simply zooming in or out, but it may also involve raising or lowering the viewpoint or moving my position to one side or another. I check the edges of the frame for intrusions such as branches or twigs and also within the frame for obvious objects such as passing cars, road signs or lampposts. Next, I try to refine the composition to provide a point of interest, make use of light and shade or lines or shapes or patterns. Then I decide upon the depth of field I want. Do I want to isolate a subject with a large aperture or try to get everything sharp with a small aperture. If I want to show movement, I use a slow shutter speed or if I want to freeze movement I will select a fast shutter speed or use flash. Then I select my point of focus. For people and wildlife this is normally the eye nearest the camera or both eyes. For landscapes it is usually 2/3 into the field of view. This process may take a second or several minutes depending upon how much time I have at my disposal. I prefer to take a good photo in the camera than spend ages trying to manipulate a poor image in Photoshop later on. Finally, I take a shot, then check it in my LCD using magnify to see if it looks right, is exposed correctly and is sharp where I want it to be. If something doesn't look correct, I shoot again continuing the process until I am happy. Then it over to Photoshop Elements to correct minor issues such as cropping or lightening, darkening and saturation. I hope this helps, but as I say, this is my personal preference. Put simply, Dynamic Range is the amount of variations in tones that can be distinguished by tour camera sensor. In practice this is somewhere between 8 and 12 f-stops depending on camera quality. However the eye is capable of distinguishing a greater range than this. In practice this means a normally exposed photo either deepens shadows into a muddy black or brightens highlights into white. In film days and now in Photoshop, you can burn in to darken areas or dodge to brighten areas. However, Photoshop and some cameras provide a facility to create High Dynamic Range (HDR) Photos. HDR combines elements from two or more photos of varying exposures into a single photo thus providing a better balanced photo. Some HDR photos take this to extremes but used wisely HDR can improve a very contrasty scene. Many HDR photos are in colour but HDR can also be applied to black and white photos. So check to see if your camera can take HDR and have a go, or take a couple of identical photos with different exposures and try HDR in Photoshop. 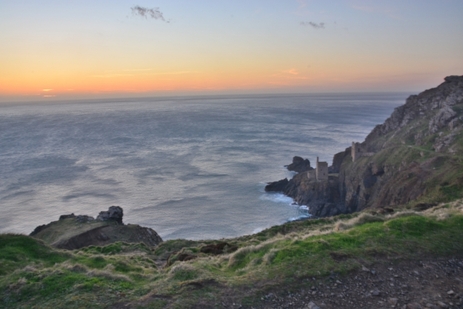 HDR Photo
This untouched HDR photo was taken using the built-in HDR facility of the Nikon D7100. I have just bought a flashgun, but I confess to knowing very little about flash. However, I came across these two Youtube videos from Nikon that give a good explanation of light and how to use flash. Although they are for Nikon speedlights, the principles apply to any make of flashgun that you can trigger remotely.
Video 1 https://www.youtube.com/watch?v=EWk_GnTzyWw Video 2 https://www.youtube.com/watch?v=kqN1wcHsREc There are also several tutorials here:- Mike Browne https://www.youtube.com/playlist?list=PLeu1p5jL9GOPXoWmEtDgR_P_o_CsXx96B Hope these help you too. How do you use your LCD screen? There is more to a screen than checking if your photo came out, if you use it's full functionality.
When you take a photo, you can check the image on the screen. Most people simply check for a second or so to see that the photo came out reasonably ok, but don't forget you can also use the magnify button. Why would you do that? Because in portrait and wildlife photography it is critical that the eyes are sharp. If you magnify and find the eyes aren't sharp you have time to take another photo and ensure that you correct this. It is too late when you get back home, no amount of sharpening in Photoshop will correct out of focus eyes. Next, did you know that on DSLR's you can usually set the camera to warn of bright highlights. With this feature, any parts of the image that are overexposed will flash. This is useful to check that a face or a sky is exposed correctly. If highlights are a problem set the camera to underexpose slightly and try again. Then there is the histogram feature which many people do not understand and therefore do not use. A histogram is simply a graph of all the tones in an image displayed from dark tones at the left to bright tones at the right. For an average image you would expect to see something like a hill with the curve rising from left to middle and then falling again. But the histogram depends upon the image. A dark interior will skew the histogram to the left and a bright sunny beach will skew the histogram to the right. Once you learn how to interpret the histogram you can check to see if an image has turned out as expected or if it needs a little underexposure (skewed right) or overexposure (skewed left). Finally, don't forget to check your composition using the screen. It is much better to compose in camera that spend time cropping or trying to recover a photo later. So keep your eyes on the screen.... and this website ! Many photographers use "point and shoot" mode, i.e. Auto or Program Modes. Yes you will mostly get a nicely exposed photo, but will you get the photo you envisaged? How many times have you taken a portrait and had a nice sharp shot of a messy background as well? This is because the camera correctly calculates the technical detail of exposure but cannot calculate that the photographer wanted to have the subject stand out from the background. Cameras don't take photographs,photographers do.
Learn how to use your cameras functionality in Shutter Priority, Aperture Priority and Manual Mode and you will lean how to be creative. Aperture will allow you to control depth of field, Shutter will allow you to control movement and Manual will give you full creative control. Get out of using Auto or Program Modes and begin to use the full potential of your camera. In Star Trek, space was the final frontier, but in photography space is the first frontier. Why?
Because space is what determines your composition. What you choose to include or choose to omit affects the final image. One simple example is the sky in landscape photographs. If we slavishly follow the "rule of thirds" we end up with 2/3 land and 1/3 sky or vice versa. This is mainly to prevent an often boring and "static" horizon line in the middle of the picture. But you don't need to stick to this so-called rule. What if the sky is really dramatic and the landscape is boring? Or the sky is grey? In these cases we can make the sky the subject and include more of it or ignore the sky completely. Another example is a photo which consists mainly of vertical elements such as people or trees. If you photograph in landscape mode you will probably end up with unwanted or boring chunks of space on either side of the frame. Simply shooting in portrait mode reduces these unwanted elements to a minimum. Look for what is the main subject in your photo. If you want to show it in it's environment, then it needs to be smaller in the frame than isolating it from its environment. This involves a selection of space. Remember too that a photograph has a frame and that the spaces within a frame are constrained by and relate to the shape of the frame. If you want to change that, then think about a frame within a frame, e.g a person framed by an arch or a doorway. Space is important, use it wisely for better composition. I am working my way through a useful DVD and book on composition and design by Michael Freeman.
It is called The Photographers Eye. The DVDS are very straightforward and informative. Each chapter is about 5 or 10 minutes long but explains things in non-technical language and has a summary at the end. The DVD's contain around 4 hours of guidance. There is a small booklet that contains the DVDs. http://www.amazon.co.uk/gp/product/1781579857/ref=oh_details_o00_s00_i00?ie=UTF8&psc=1 The book covers far more than the small booklet with the DVDs and can be bought in used condition quite cheaply. http://www.amazon.co.uk/gp/product/1908150912/ref=oh_details_o01_s00_i00?ie=UTF8&psc=1 I recommend buying both to anyone who would like to improve their composition skills. |
About MeI am a retired IT professional. I use my spare time by travelling and taking photographs. I love wildlife and history. Archives
March 2022
Categories |
 RSS Feed
